
This is the second part of ZDI's tutorial on oil pastels. Be sure to read the first part if you haven't already!
Here, she covers the different materials that you might need, as well as some recommendations.
Oil pastels
These come in many different grades and quality. Some may or may not be available where you live. I use a mixture of Sennelier (very expensive and very soft - best for the final layer), Gallery by Mungyo (a bit harder) and Daler and Rowney (the hardest and most readily available in the UK).
Other brands are also available I just haven’t tried them so can’t comment. I’ve heard other artists use Van Gogh and Neo Pastels which are also professional grade and get great results too.
Paper/Surface
You need a surface with at least a little bit of texture to it. The more textured, the harder to blend but the more layers you can apply. So you want something with enough texture but not too much. There is a vast array of options available out there of papers, panel and canvases. I personally tend to work on paper as it’s easier to store, so haven’t tried the various panel and canvas options.
I have used the following in the past:
BlackPad by Frisk
This is available the Sketch A Day Store. This is a very cheap way of starting oil pastels. You can get a reasonable 3-4 layers which is surprising because it doesn’t feel that textured. The dark colour is also good because it hides when you accidentally get pastel on the paper far better than white paper would.
Sandpaper
I get this from the hardware store and its another cheap option. I usually use 400 grain sandpaper or higher (ie finer). You get nice textures with this and it works really well with the harder oil pastels. I would be careful using sennelier on this because you will end up using a lot! The main downsides are you can only get relatively small sizes and the finer grains tend only to be available in dark grey/black.
Watercolour paper
If you already have a decent quality watercolour paper, it will probably work with oil pastels, certainly other artists recommend it. I think mine just doesn’t really have the right texture, it tends to leave too many gaps even after several layers so I don’t use it for pastels.
Seawhite of Brighton
(Thanks to @Callum_Russell for the recommendation). This is a nice surface with a bit of texture. It also is a bit multipurpose so you can use it for other media too. Comes in nice colours and you can get several decent layers from it.
Browse Seawhite of Brighton paper here
ClaireFontaine PastelMat
This is what most oil pastelists rave about. It doesn’t feel very textured but you get very similar results to sand paper and (cucially) is available in white. Both oil and soft pastels stay exactly where you put them. I’ve done a couple of pieces with some samples I got ahold of and it’s amazing! It is however quite expensive so you may not want to start with this if you’re just trying out oil pastels.
Tissues/cloth
Oil pastels are messy work. You blend a lot and one colour will get onto another stick and it gets all over you hands. Have something to wipe your hands and pastels handy.
Other non-essential items (but if you’re an art supply fiend like me you might want)
Medium
This is not essential, but if you already paint in oil colour you may have some solvents that you can use as thinners. You rub your pastel onto the the area then use a paintbrush to get a nice even colour. It’s great for that first layer to ‘underpaint’ your work.
Sennelier also do a nice Transparent pastel stick, which also works well. You coat your surface under where you will work with the transparent stick and your pastels will glide more easily. Be careful though, don’t add too much or you won’t be able to add many layers. I had trouble getting hold of this, lots of places in the UK don’t stock it. I got it in the end from the SAA.
Soft Pastels
I often use soft pastels first just to put in my ‘underpainting’ before doing my actual piece. It means I can add shadows or contrasting colours under my work much in the way that oil painters underpaint their work to give it more dimension. Also soft pastels cover the paper much quicker so it means you can get to the fun part much quicker. Make sure you spray your fixative and let it dry before applying oil pastels.
Pencils / Coloured pencils
In addition to drawing your picture before adding the oil pastels, this is useful for scratching your work, or (using a soft 6B/8B) to draw in some lines. I use some oil based coloured pencils to add a few details at the very end. The darker/contrasting colours work better than light colours.
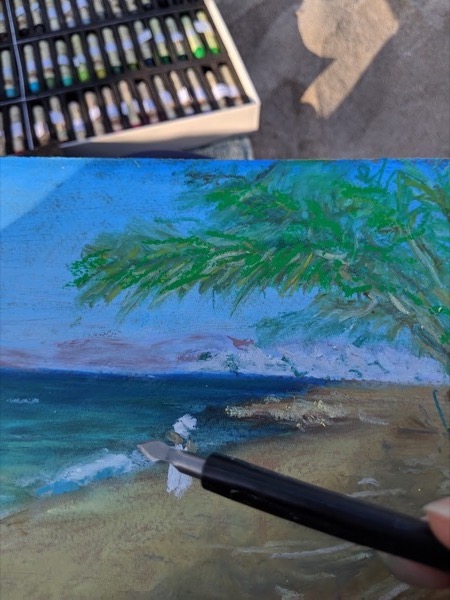
Scrapers
One of the nice things about oil pastels is you can scrape of layers to see the colours underneath. You can use palette knives, scrapers or even the tip of a mechanical pencil for this purpose.
Blenders
The best blenders are you fingers! (Someone will probably tell me off and tell me that it affects the archival quality of your work). To get into detailed areas I also use paper tortillions exactly the same as pencil artists use and rubber blenders (usually used by clay artists), but I mostly use my fingers.
Keep an eye out for the final part of the tutorial, where ZDI walks you through a full oil pastel project...